
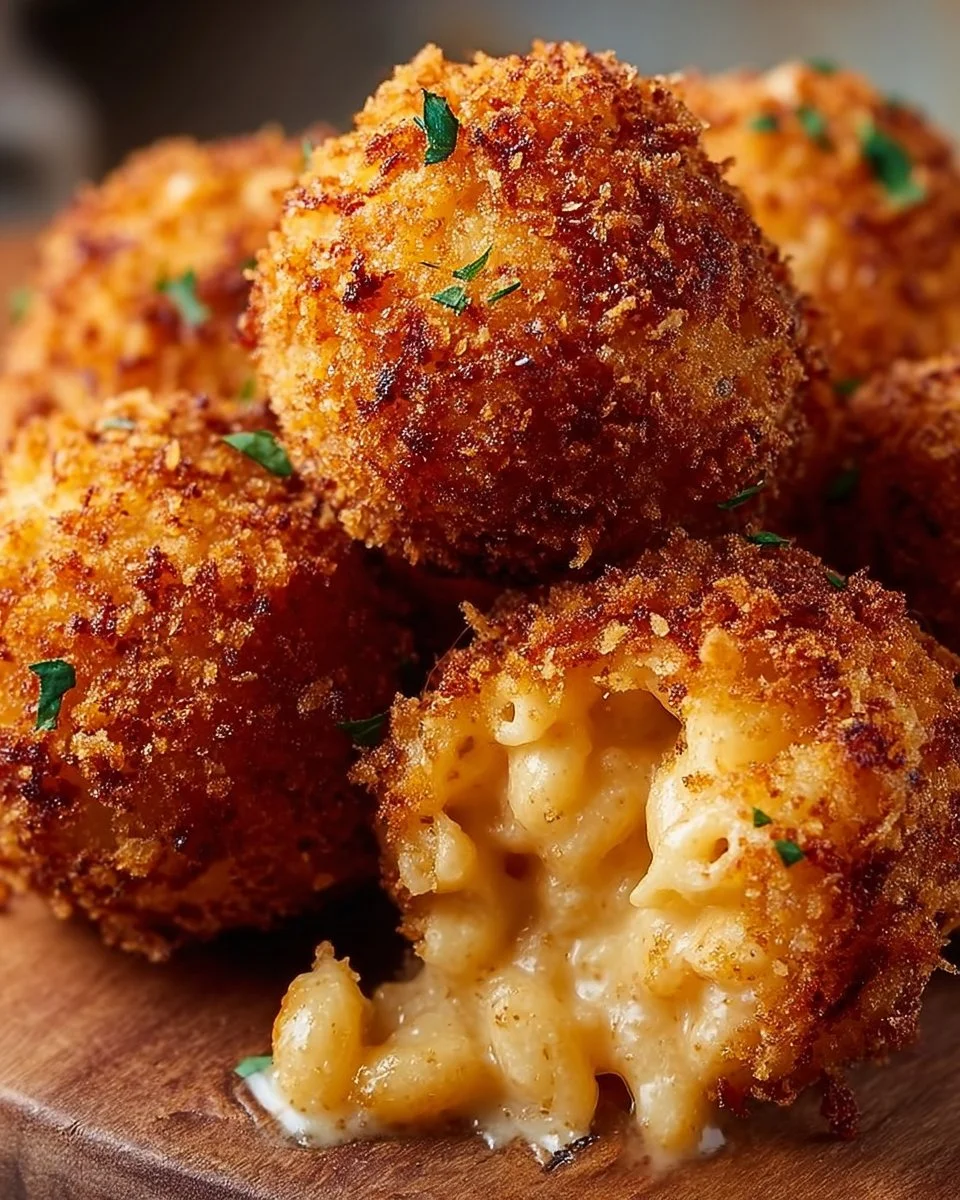
There’s something truly special about the crispy, golden bites of Cheesecake Factory Air Fryer Fried Macaroni and Cheese Balls. Each one is a delightful surprise, with that warm, gooey cheese filling that promises to make your taste buds dance. As you take a bite, the satisfying crunch of the outside gives way to creamy, cheesy goodness inside, making it a wonderfully indulgent treat. Whenever I have a gathering or a cozy night in, I whip these up as the perfect shareable snack; they always bring a smile to everyone’s face!
The beauty of these little treasures is that they come together surprisingly fast! Perfect for busy weeknights or fun gatherings, they are a versatile option that can work as a main dish, appetizer, or even a party snack. And let’s not forget about leftovers—if there are any! These cheesy delights can be easily reheated, making them a joy to savor again.
Why I Love Cheesecake Factory Air Fryer Fried Macaroni and Cheese Balls
I can’t help but sing the praises of Cheesecake Factory Air Fryer Fried Macaroni and Cheese Balls! Not only are they incredibly easy and undeniably delicious, but they hit that sweet spot between comforting and fancy. The flavor profile is a harmonious blend of mozzarella and Parmesan, giving you that cheesy richness you crave. Plus, they are a true winner at my table, whether I’m serving them for a casual family dinner or as part of a special occasion.
Cheesecake Factory Air Fryer Fried Macaroni and Cheese Balls Ingredients
The magic of these Cheesecake Factory Air Fryer Fried Macaroni and Cheese Balls truly lies in the harmonious blend of simple ingredients that create a rich, indulgent dish. Don’t worry about exact measurements just yet; those are all in the recipe card for you!
Core Ingredients and Their Roles
- 1 cup ELBOW MACARONI: These little gems pack a mighty punch, serving as the base of our cheesy goodness!
- 2 tablespoons BUTTER: A rich way to start, adding flavor and helping to create our creamy sauce.
- 2 tablespoons ALL-PURPOSE FLOUR: This is essential for making a roux to thicken our cheese sauce to perfection.
- 1 1/4 cups MILK: The creamy counterpart that gives our sauce its luscious consistency.
- 1/2 teaspoon GARLIC POWDER: For that depth of flavor that leaves you wanting more.
- 1/2 teaspoon ONION POWDER: It complements the cheese beautifully, enhancing the overall taste.
- 1/2 teaspoon SALT: A little sprinkle to help bring all the flavors together.
- 1/4 teaspoon BLACK PEPPER: A hint of spice that elevates each bite.
- 1 1/2 cups SHREDDED MOZZARELLA CHEESE: These are the stars! They melt beautifully, creating that sought-after gooey texture.
- 1/2 cup GRATED PARMESAN CHEESE: Adds a zesty kick that pairs wonderfully with the mozzarella.
- 1 large EGG: This will bind our macaroni and cheese balls together perfectly.
- 1/2 cup BREAD CRUMBS: For that lovely, crispy coating on the outside.
- 1/2 cup PANKO BREAD CRUMBS: These add an extra crunch that makes each ball even more delightful.
- 1/4 cup ALL-PURPOSE FLOUR: To help with the coating process for additional crispiness.
- Vegetable oil for spraying: This helps achieve that golden brown exterior when cooking.
Substitutions and Tips
Need a swap? If you’re low on mozzarella, you can use cheddar cheese instead for a sharper bite, though it won’t be quite as stringy. Want to switch things up? Try adding some cooked bacon bits or jalapeños to the mixture for a bit of heat and extra flavor! If you don’t have panko on hand, regular breadcrumbs will work fine, but keep in mind they won’t be as crispy.
Kitchen Tools You’ll Need
- Air fryer (any size works!)
- Medium saucepan (2-quart works like a charm)
- Baking sheet (for cooling and forming the balls)
- Parchment paper (to prevent sticking)
- Shallow dishes (for egg wash and breadcrumb mixture)
- Whisk (for combining ingredients)
- Mixing bowl (for the macaroni and cheese mixture)
How to Make Cheesecake Factory Air Fryer Fried Macaroni and Cheese Balls
Let’s dive into creating these incredibly mouthwatering Cheesecake Factory Air Fryer Fried Macaroni and Cheese Balls. I’ve broken down the process into simple steps. Follow along, and you’ll have a delicious meal in no time! We’re aiming for crispy, golden perfection on the outside with creamy, cheesy delight inside.
Cook the Pasta & Prepare the Base
First, cook the elbow macaroni according to package instructions. Once cooked, drain and set aside. You want it tender but not mushy, as it will cook a bit more while being fried.
Make a Roux
Next, in a medium saucepan, melt the butter over medium heat. Add the 2 tablespoons of all-purpose flour to the melted butter and whisk continuously for about 1-2 minutes to create a roux. This step is key to achieving that creamy sauce we’re all after!
Create the Cheese Sauce
Now, slowly pour in the 1 1/4 cups of milk while whisking to avoid lumps. Add the garlic powder, onion powder, salt, and black pepper to the milk mixture, and continue to whisk until smooth. Allow this mixture to simmer for about 3-4 minutes until it thickens slightly.
Melt in the Cheeses
Once thickened, stir in the shredded mozzarella cheese and grated Parmesan cheese until fully melted and smooth. The aroma wafting from the pot will have you salivating for sure!
Combine with Macaroni
Remove the saucepan from the heat and add in your cooked elbow macaroni, stirring to coat the pasta evenly with the cheese sauce. Make sure every piece is dressed in cheese bliss!
Cool and Form the Balls
Let the macaroni and cheese mixture cool for about 15-20 minutes. Then, scoop small portions of the mixture and form them into ball shapes with your hands. This part is a bit messy but oh-so-fun!
Prepare the Coating Station
Place your formed macaroni balls on a parchment-lined baking sheet or plate. In a shallow dish, whisk the large egg until fully beaten. In another dish, combine the bread crumbs and panko bread crumbs—this crunchy combo is going to make these balls sing!
Coat the Mac & Cheese Balls
Roll each ball first in the egg wash, and then coat it in the breadcrumb mixture, ensuring each ball is fully covered. Place the breaded macaroni balls back onto the parchment-lined baking sheet. You want all that crunchy goodness on the outside!
Let’s Get Crunchy
Now, spray each ball lightly with vegetable oil to help them crisp up during cooking. Preheat your air fryer to 375°F (190°C).
Air Fry for Perfection
Arrange the breaded macaroni balls in a single layer in the air fryer basket, making sure they are not touching each other. Cook the balls in the air fryer for 8-10 minutes, flipping them halfway through. We’re looking for golden brown and crispy on the outside—this is your moment!
Cool Slightly and Devour
Finally, carefully remove the macaroni and cheese balls from the air fryer and allow them to cool slightly before serving. Serve them with your favorite dipping sauce and enjoy every cheesy bite!
How to Store Cheesecake Factory Air Fryer Fried Macaroni and Cheese Balls
If you happen to have leftovers (lucky you!), they maintain their quality surprisingly well. At room temperature, they can be left out for about an hour. For refrigerator storage, place them in an airtight container and enjoy within 3-4 days. If you want to keep them longer, freeze them for 2-3 months. When you’re ready to enjoy them again, simply thaw them in the fridge overnight and air fry them at 375°F (190°C) for a few minutes until heated through.
Tips for Success
- Make sure the macaroni mixture is well-cooled before forming balls to prevent them from falling apart.
- Use freshly grated cheese for the best melting quality; pre-packaged cheese might not melt as smoothly.
- Don’t rush the frying process; crispiness is all about giving them enough time to achieve that golden exterior.
- Try adding herbs like parsley or chives to the cheese mixture for an extra flavor boost.
- Experiment with dipping sauces—a tangy marinara or a spicy ranch can elevate the experience!
Serving Suggestions
- Serve with a side of marinara or ranch for dipping.
- Pair them with a fresh tangy salad to balance the richness.
- Consider a chilled sparkling drink or craft beer for a delightful pairing.
- Garnish with fresh herbs for a pop of color.
- Present on a wooden board for a rustic touch at your next gathering!
Now, grab your ingredients, and gather some friends or family—let’s fry up some cheesy joy that will make your heart sing! You’ll be so glad you did!


Leave a Comment